
Timber Drying Guide
Air drying your Australian hardwood is a straightforward, budget-friendly way to get great results. We will look at decking and cladding boards, but this guide can be used for drying any Australian hardwood for general purposes. Using the 25x25mm drying sticks included in our DIY Dry-It-Yourself Board Packs, this guide gives you simple, practical steps to stack your timber like a pro, based on Australian best practices.
A Practical Guide To Timber Drying: Stacking Australian Hardwood for Air Drying
Air drying your Australian hardwood is a straightforward, budget-friendly way to get great results. We will look at decking and cladding boards but this guide can be used for drying any Australian hardwood for general purposes. Using the 25x25mm drying sticks included in our DIY Dry-It-Yourself Board Packs, this guide gives you simple, practical steps to stack your timber like a pro, based on Australian best practices.
1. Why does stacking matter for air drying?
Stacking boards properly lets air flow around them, helping them to dry evenly. This stops warping, cracking, or fungal rot, keeping your hardwood in top shape.
2. What are 25x25mm drying sticks?
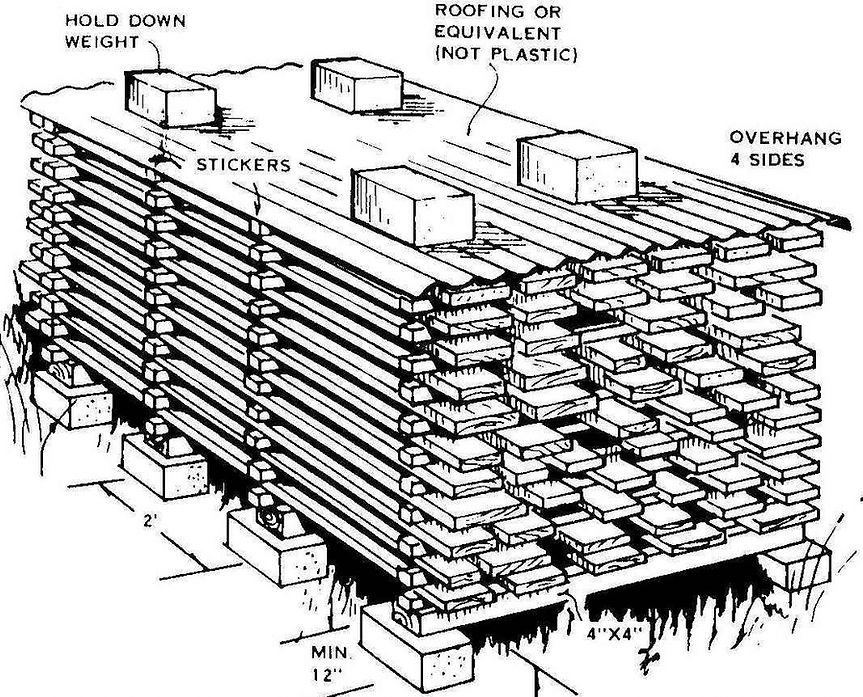
Drying sticks (or stickers) are 25mm x 25mm timber strips that you place between layers of boards to create gaps for airflow while supporting the boards and helping the timber dry evenly without problems. Our DIY Dry-It-Yourself Board Packs include these sticks, but you can buy extras if you need more.
3. Where should I stack my boards?
• Best spot: A flat, undercover location is best for drying timber, but be aware of timber staining any concrete or hard surfaces. Inside a shed, with solid floor you can use 25mm drying sticks as the base but lay a tarp underneath to prevent staining.
• Outside stacking: Outside is perfectly fine, but be aware that moisture runoff can cause staining on concrete or hard surfaces. Cover the top with tin or similar to stop direct sun and moisture. Never cover the sides as airflow is a must.
• Sloping ground: Sloping ground is fine, but don’t let one of the 4 corners of the stack be lower than the other 3 as this will twist the boards over time. The stack doesn’t need to be level but needs to be flat.
• Keep it dry: Pick a well-drained spot to avoid water pooling under the stack.
4. How do I stack my boards?
Follow these easy steps to stack your hardwood:
1. Build a flat base to stack on: Setting up a flat base consists of chocks with cross rails the width of the stack. These should be placed at each end of the stack and every 500mm along the length of the stack.
Chocks should be at least 50mm off the ground they can be concrete blocks, bricks, pallets, timber or anything that can provide sold support for the duration of drying.
Cross rails can be any timber strong enough to support the stack (boards from the stack can be used as these foundational solid supports but can bow if lacking enough support. A chock under them every 300mm is ideal for these smaller cross rails). For best results we recommend to purchase a few meters of 100x50 with your order to use as these supports they are always handy to use for other jobs once you are finished drying your timber.
Ensure corners of the stack line up as a flat surface within 5-10mm (the boards will mimic any twist in the base).
2. Add your first row of boards allowing gaps of 10mm between boards, once the row is full add drying sticks: Place 25x25mm drying sticks across the boards, every 500-600mm. Put sticks within 50mm of the board ends to support the end grain and prevent cracking.
3. Stack more layers: Add the next row of boards directly above the first, keeping them lined up. Place drying sticks between each layer, aligning them with the ones below for even support.
4. Stay tidy: Keep the stack straight to avoid sagging or twisting.
5. Cover the top: Use a flat, heavy cover (tin is best, weighted or ratchet-strapped around the stack) to protect from rain while leaving the sides open for air circulation.
5. How far apart should drying sticks be?
Space 25x25mm drying sticks at a maximum of 600mm apart along the boards. Place sticks within 50mm of the board ends to support the end grain, which prevents cracking.
6. Should I paint the ends of the boards ?
Painting the board ends is a great idea, helping to slow down drying at the end grain preventing loss due to cracking.
7. How long does air drying take?
One thing to remember is hardwood is not steel. It is always breathing moisture in and out and as such you need to treat it like its alive and will always have some degree of movement, but as a general rule the greener the material the more likely it is to move. That said some hardwood can be used straight off the mill green in the right circumstances, for uses like post and rail fences, or verandah posts, wharf construction, weatherboards even external decking and cladding boards can be laid green or semi-green if you want that rustic old barn look and have enough support to avoid excessive warping.
Full drying depends on the timber type, board thickness, and weather. A rough guide is one year per 25mm of thickness to reach 12-15% moisture content, ideal for decking or cladding. For example, 25mm thick boards take about 12 months.
8. Which Australian hardwoods can I air dry?
Most Australian hardwoods work well for air drying, including:
• Spotted Gum: Dries well but may warp if the base isn’t level or lacks support.
• Blackbutt: May get small surface cracks; keep end sticks close to board ends.
• Grey Ironbark: Dries slowly and may show surface checking; needs good airflow.
• Tallowwood: Dries evenly but needs extra ventilation to avoid mold in humid spots.
• Turpentine: Fairly stable but may get small checks; stack carefully.
Ask our team for tips on your specific timber.